For Hobby Artists: What to pack for a writing retreat for artists, clothes, tech, writing equipment, jewelry, clothes and more.
How to Draw Turtles and Tortoises
Introduction
This easy artwork is for anyone who wants to draw turtles and tortoises.
Turtles and tortoises look similar as they have a shell, both are cold-blooded reptiles.
A turtle can swim and lives mainly in water but can walk on land. A turtle breathes air and takes a huge gulp and holds its breath before diving down into its pond’s depths.
A tortoise lives on land.
Both turtles and tortoises lay their eggs on land.
Daily Art Practice
This is part of a basic shapes set of posts I am creating to help you get creative and build your daily art and drawing practice.
These simple drawings can be done with your kids.
Basic Shapes
Basic shapes are determined by the number of lines taken to make them such as circles, eggs or ovals which take one line, a triangle that takes three lines and a square that takes four lines.
The basic shapes are dots, lines, circles, ovals, eggs, semi-circle, vesica Pisces, triangles, squares, rectangles, pentagrams, hexagrams, and other polygons.
For the turtles and tortoises, we will use a basic two-line semi-circle shape.
Art Supplies
Markers
For this artwork I used Tombow markers, but you can use what you have at hand.
I wanted to have a grey tinge to the greens and avoided harsh emerald greens which are far too bright.
The three shades of green I chose were numbers 098, 133 and 126 from Tombow dual brush pens.
Pens
For the reptile details, I used two pens, Pigma Micron 0.1mm black pen and a Faber Castell 0.5mm Pitt Artist pen in black.
Paper
I chose marker paper from Strathmore, but you can use what you have at hand.
Do not feel that you need the exact art supplies which I employed to make this artwork, and this stops you.
Always use the art supplies that you have available right now in your home.
Note: For a full list of the art supplies I use please go here.

Drawing Composition
To create depth in your artwork, place the larger shapes in the bottom third, the medium figures in the middle third and the far profiles on the top third of the page.
If your tortoises are all the same size and the same shape, the final result could be dreary.
Alternatively, if you have a variety of sizes (with the same semi-circle shape), it adds interest to your composition.
Step One: Light Green
With the lightest green, draw a semi-circle shape in the middle of the page, make the base about 25mm, or one inch, long.
Draw a slightly smaller semi-circle higher and to the right.
Draw a still smaller semi-circle towards the top left.

Step Two: Mid Green
Now choose the mid green and draw three semicircles with the large one at the bottom, the medium one in the middle and the smaller one towards the top.

Step Three: Dark Green
Select the dark green and draw three semicircles with the larger shape towards the bottom, the medium one somewhere in the middle and the smaller one more towards the top.
Now you have nine semicircles on your page.

Tips
At this point you could add one or two more semi-circles if you like. However, try to keep the overall theme to an odd number of shapes as this practice results in a more pleasing composition.
You can also overlay one or two shapes to add interest.
Step Four: Head, Limbs and Tail
With a color not the same as the shell, draw in a head that swoops up from the shell.
Draw the head and neck one piece with the head slightly rounder than the neck.
Then draw the front legs and the back legs slightly bent with the knees and elbows pointing forwards.
Now add a little tail straight horizontally from under the back of the shell that tapers at the end.

Step Five: Details
With the thin 0.1mm black pen draw the eyes as a dot.
Draw the lines on the shell in a hexagon pattern as shown.

How to Use This Art
- Pictures.
- Stickers.
- Greeting cards.
- Sketchbook doodles.

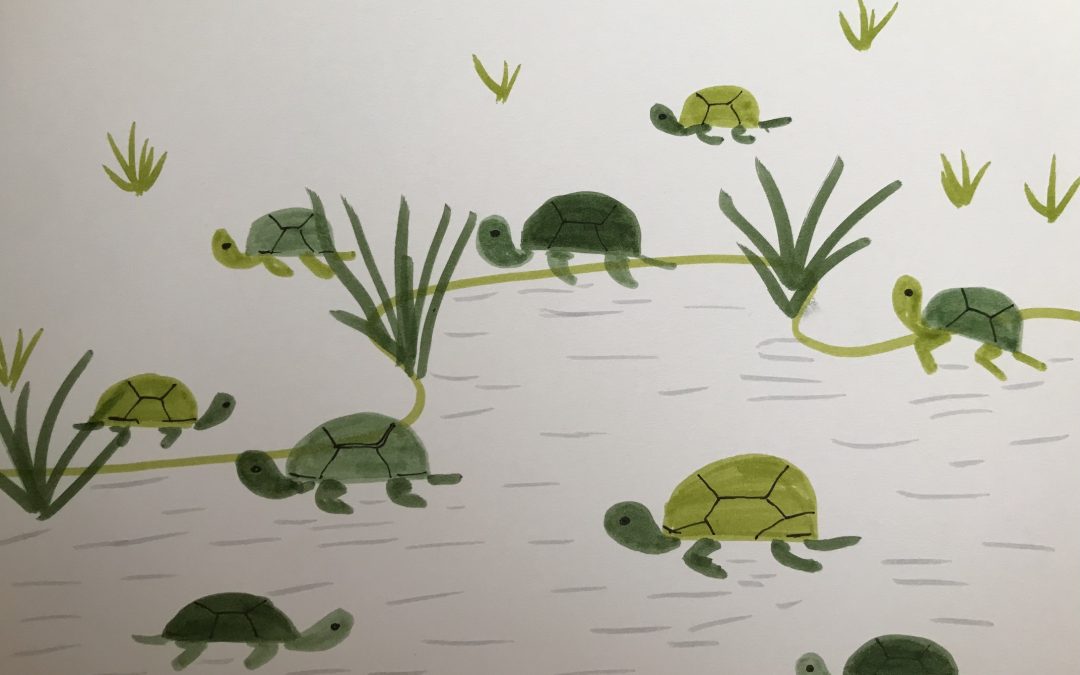
Aspiring Artist Activity: Turtles and Tortoises by the Pond
On a fresh piece of paper please do the following:
Background
- Draw a wavy line to suggest the edge of a pond across the page two thirds of the way down.
- With a dark green, draw some reeds in three clusters growing out of the pond at the water’s edge.
- Lightly shade the water grey/blue (not too heavy now).
Add Wildlife
- Draw three or four turtles in the water.
- Draw three or four tortoises on the bank.
- Add a ninth reptile, perhaps a turtle to balance the drawing and add interest with the odd number of animals. Choose to have this turtle climbing out of the water or right on the water’s edge.
- Add any final details as you see fit. I like to add a little gold gel pen here and there.
- Sign and date (month and year) your artwork in the lower right-hand corner of the sheet of paper discreetly with one of the markers or pens used. Never use a different pen to sign your artwork, always use one of the mediums used in the artwork.
What to Pack for a Writing Retreat
For Hobby Artists: What to pack for a writing retreat for artists, clothes, tech, writing equipment, jewelry, clothes and more.
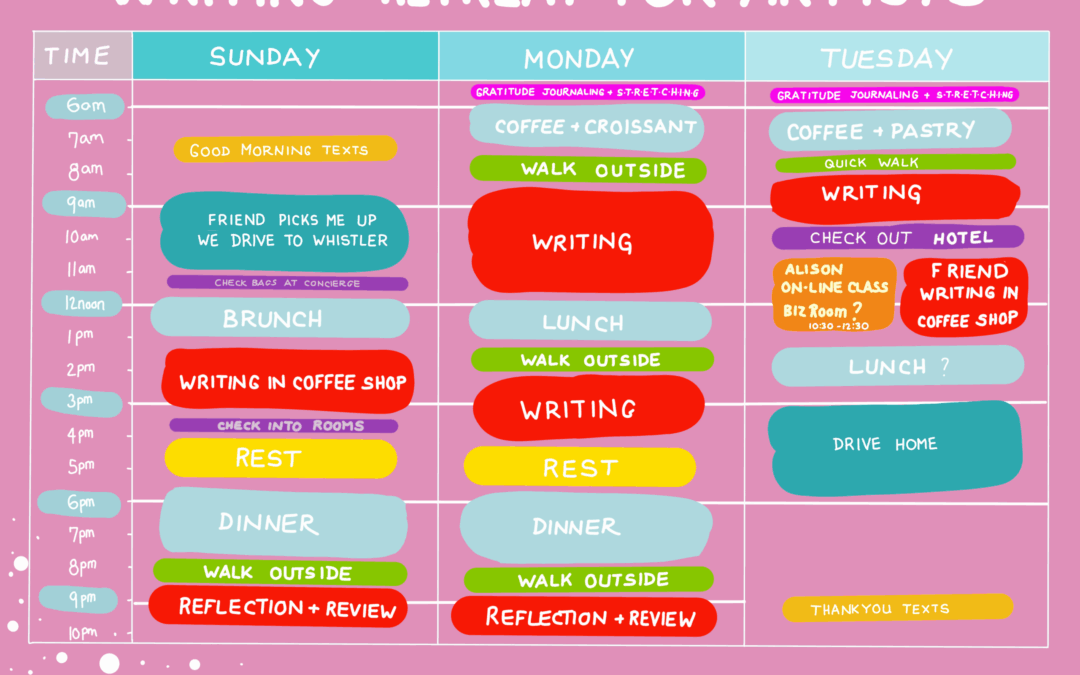
Writing Retreats for Hobby Artists
Author: Alison Hazel - Updated: July 2025 Planning a Writing Retreat for Artists Introduction...